- Installation
Minimum installation requires at least two files :
- gps24exe.zip
Program alone, without any other files.
- gps24.zip
All other files, which are necesary to run gps.exe.
Both files together are approximately 1.4 MByte in size.
In order to use the World Data Base (WDB) View with all its features, you need
the following files as well. These files hold the data for country borders, rivers, etc.
- WDB - Data for Europe
( 799.238 Bytes packed / 1.326.222 Bytes normal size)
- WDB - Data for Africa
( 1.189.582 Bytes packed / 2.250.654 Bytes normal size)
- WDB - Data for North America
( 2.065.507 Bytes packed / 3.063.882 Bytes normal size)
- WDB - Data for South America
( 1.169.747 Bytes packed / 2.209.594 Bytes normal size)
- WDB - Data for Asia
( 2.662.646 Bytes packed / 4.722.616 Bytes normal size)
This file also helps to increase the quality of the WDB view. The bitmap, which comes with
the program is just 512*256*16Mio.
- WDB - big bitmap (1440*720*16Mio)
( 2.838.633 Bytes packed / 3.110.454 Bytes normal size)
You will also need a copy of WinZip
or PkUnZip (DOS), to unzip the files.
The installation has to be done in a couple of steps, depending on the files you have downloaded. If you have all the
files, you just need to unzip all of them in one folder. You shouldn't have any problems now to run 'GPS.EXE' and use
all the program features.
If you have downloaded just the program (gps24.zip AND gps24exe.zip), then you can still use all the
different views of the program but you can't draw the borders in the WDB view. It is also possible to download just the
continents you want to see (eg. Europe and North America). In this case the WDB view will draw just those countries and
borders.
After unpacking the zip-files, you should test to see if the program is running. If everything seems to work, it might
be a good idea to delete the zip files, since they take up to 12 megabyte of hardrive space. If you want to, you can
archive them on a 'ZIP' drive or other backup tool.
If the program is not running at all, please check if you have installed the OpenGL drivers. You can find links to
download them under links*.
Now you can choose under File->Open the satellites you want to display. For an
accurate satellite position prediction see also the chapter on Satellite
Position Prediction.
( * : see http://www.MovingSatellites.com )
- Satellite Position Prediction
To predict the position of a satellite within a given range, it is necessary to have the latest data for this satellite.
Due to interferences in the satellite's orbit, it is necessary for the control stations to adjust the orbit of a
satellite from time to time, using its thrusters. The corrected orbit is now COMPLETELY different from the former
orbit.
Also, the mathematical orbital models for the position prediction is NOT perfect and the data needs to get updated
from time to time. The most obvious indicator will be satellites that have negative altitude. In that case, you need to
update the database.
Some links to datasets can be found under links. To install them, copy them simply
to the folder where you have installed GPS and make sure the file extension is '.tle
' or '.sat'.
You now have the latest dataset available. NORAD corrects them on a as needed basis, to ensure the accuracy. If you download
the database once a week, you can achieve an accuracy of better than 5 arc seconds. See also
here.
If you use GPS.EXE just to display the satellite movements and the mechanics behind it, it is not necessary for
you to update the database more than maybe once a year, if at all. But always keep in mind that the actual position
could be completely different.
- The Sun, the Moon and the Stars
The program displays the earth and the orbiting satellites pretty accuratly. However the earth is in the center of the
3D-View. This means that the earth is not surrounding the sun but on a fixed position (0,0,0).
Nevertheless, the day and night line and the sun movement during a year's circle, will be displayed by moving the
sun position up and down in the Y-direction.
The moon is implemented, but so far has no texture. You still can pay the moon a visit and search for
the man in the moon :-).
The stars are also fake. The number of stars can be set under 'Options->General'. The star positions are generated
using a random generator. Keep in mind that the main goal of the program is to display satellite positions relative
to the earth.
If you are interested in the star constellations, I would suggest to download the shareware program
HomePlanet, which I think is very nice for this purpose.
- The Different Views
This program has four different views.
- 3D-Orthogonal View
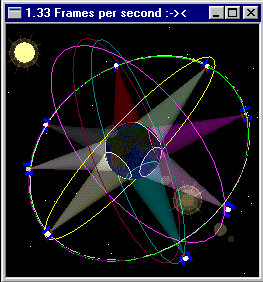
In the 3D-View, the earth is displayed as a sphere and the satellites orbit it.
It is possible to move, rotate or zoom in this view. Also it is possible, to change the satellite models
being used to a cube, sphere, point or a user defined shape (see also File formats and
used data).
The color of the satellite route and the color of the beam matches the colors of the other views.
|
 |
- 2D-Equidistance Mercator View
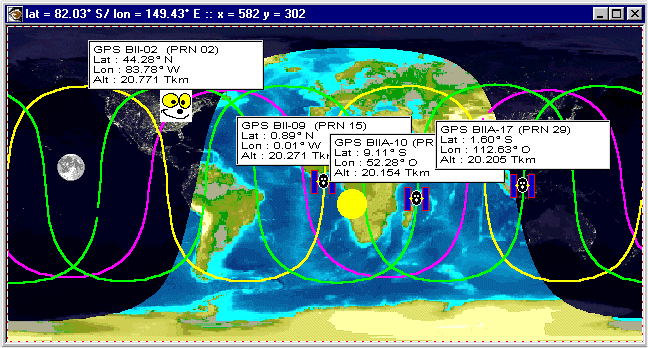
Within the 2D-View, the complete earth's surface is displayed and the satellites are shown as icons. This view
is also called Mercator view or, to be more concrete, an equidistance mercator view. This means that the
projected latitude and longitude distances have the same distance no matter how close we look towards the
North or South pole. This results in a high distortion of the circular satellite footprints close to the poles.
This view also displays the day/night line and the sun / moon position. |
 |
- WDB-Equidistance Mercator View
|
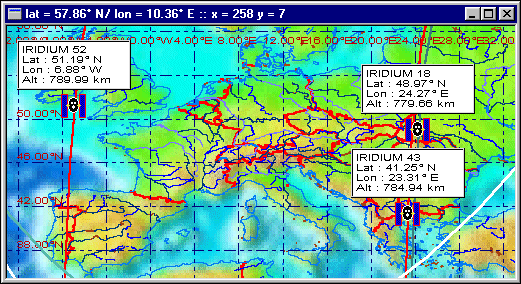
This view is also an equidistance view, but in contrast to the former view, it is possible to zoom into this
view and pan around using the mouse. This way you can go to any point on the earth easily. This view is
necessary to display the low earth satellites in greater detail. It utilizes a town database with approx.
2700 towns and also the World Data Base data (approx. 16 mega bytes) to draw borders, coastlines, rivers,
and seas. It is posible to open up to 10 WDB-Views at once. |
 |
- OBS-View
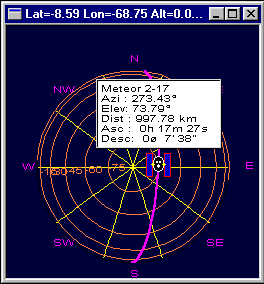
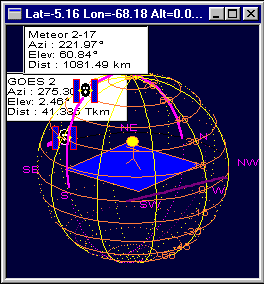
The Observer's view is useful if you want to know where you have to look to see a satellite. You can move
the observer's position by simply using the mouse, or by specifying the coordinates using the goto-dialog.
It is possible to view the 'skyplot' in a sphere-like style. As a result, a figure is drawn to symbolize
the position and up/down.
The second possible style is to keep this view 2D. In that case, the view is drawn as if you would look into
the sky from that position. The 'N' marks the North direction, 'S' South and so forth.
The red cross in the 2D-View symbloizes Up, Down, Left and Right. |
  |
- Mousehandling
The mouse can be used in all views to modify the position, angle or size. I strongly recommend that you play around with
the mouse in the different views rather than read this chapter. The cursor will change to symbolize the action that will
take place.
- 3D-View
- Left Mousebutton
 |
If you press the left mouse button, you can 'pan' the view. Panning means that you move in X-Y direction.
But be easy with it, since the earth might go out of sight with little mouse movement. In that case,
you can bring the earth back into the center by double clicking in the view. |
- Right Mousebutton
 |
Pressing the right mouse button will rotate the earth in the 3D-View around the X- and Z-axis. |
- Middle Mousebutton
 |
Pressing the middle mouse button will rotate the earth in the 3D-View around the X- and Y-axis. |
- Right & Left Mousebutton
 |
Pressing both, right and left mousebutton, will enable you to zoom in and out. Moving the mouse up will
zoom into the view (earth is growing in size), moving down will zoom out. |
- Double click
Double clicking in this view brings the earth back into the center of the view.
- 2D-View
- Left Mousebutton
 |
If you press the left mousebutton, then you will rotate the earth in the 3D-View to the position where
the cursor is in the 2D-View. The earth will always face upwards. If the view is inactive, then nothing
will happen and the cursor won't change its form. |
- Right & Left Mousebutton
 |
These buttons will zoom the 3D-View in and out, as if you would press the buttons in the 3D-View itself.
If the 3D-View is inactive, then nothing will happen and the cursor won't change its form. |
- Double click
Double clicking in the 2D-View will move the view into the center and resize it to the original size of
the background texture (usually 512*256). This will speed up the drawing time since a faster drawing
routine can now be used.
- WDB-View
- Left Mousebutton
 |
The left mousebutton will pan the WDB-View until it hits a side of the 'world'. A rectangle is drawn in
the 2D-View to visualize the extensions of the actual WDB-View. |
- Right & Left Mousebutton
 |
These two buttons will zoom the WDB-View in and out. The rectangle in the 2D-View will change accordingly.
If you want to change the ratio of the WDB-View, you need to press the 'Z'oom button on the toolbar first
and cut the part you want to see closer. |
- Double click
Double clicking in the WDB-View will move the view so that you see as much of the view as possible. If the
view exceeds the main frame, then a slider bar will be displayed at the side. The WDB view doesn't need to
be any particular size, it all depends on the zooming ratio you picked. For example, to display all of
Africa, your WDB-View might be 200 pixel in width but 700 pixel in height.
You can change the Zooming ratio in the General Dialog.
- OBS-View
- Left Mousebutton
 |
Pressing the left mouse button will enable you to move the actual observer position to any point on the
earth's surface. If the 2D-View is activated, a red cross will symbolize the actual observer position and
also the direction you are looking at (arrow). |
- Right Mousebutton
 |
The right mouse button will rotate the OBS-View. This will change the direction the observer is looking
towards (The Forward direction). |
- Right & Left Mousebutton
 |
Pressing both mouse buttons will zoom the OBS-View. |
- Program-Menu (english)

The menu can be activated not only by using the mouse, but also by using the 'ALT'-key plus the menu key.
The menu key is the underlined letter in the menu bar.
Here are the descriptions of all the menus and sub-menus.
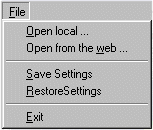 |
- Open Local ... : This menu item enables you to change the actual satellite database.
The titelbar of the main window will display the name, the number of satellites, and the creation date of
the database file.
- Open from the web ... : This will bring up the Internet Dialog,
where you can download the latest TLE data file from the Web.
- Save Settings : This allows you to store the actual settings of
the program. All important program information will be stored to a file, including color, satellites, camera
position, time, size and position of the windows and, and, and ...
- Restore Settings : Here you can restore a previous stored setting. The
actual state of the program is not important.
- Exit : You can terminate the program with this point.
|
 |
- Play : With this point, you can stop the animation of the program. No new
frame will get calculated, this will speed up the input of the mouse and keyboard again.
Keep in mind however that there will be no refresh in the 3D-View. You might move the earth out of the
windows view without realizing it.
- Pause : Here you can stop the animation but the window will still be
refreshed. It has the same affect as setting the timefactor to 0.
- Reset : This will recalculate all internally stored data and refresh
all views.
- Zoom : This point is just active in the 2D- and the WDB-View. If you
activate this flag, you can cut out a part of the earth, which will then be displayed in an WDB-View.
- Draw : This point is just active in the WDB-View. It will draw the
World data Base data (borders,rivers,coastlines, etc.) into the View. This might take some time, or if you haven't downloaded any WDB-datasets
it will do nothing at all.
- Time ... : This will open the Time dialog.
With this dialog you can change the actual program time and the animation speed.
|
 |
- Satellitedatas ... : If you activate this menu item the
Satellite data dialog will be opened. Here you can view more details
about each satellite data entry in the database.
- Export ... : If you activate this menu item the
Export dialog will be opened. Here you can generate a list with satellite positions and
edit / save / print them. The format is similar to the Trakstar output.
|
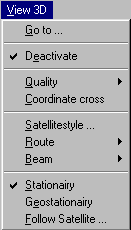 |
- Go to ... : This will open the Go To dialog. With the
help of this dialog you can go to a specified point on the earths surface.
- Deactivate : This will deactivate the view.
- Quality :
- Coordinate cross : If this menu item is checked, a cross will be drawn in
the earth's center.
- Satellitestyle ... : This will open the
Satellite Style dialog. Here you can change the apearance of the satellites
in the 3D-View.
- Route :
 |
- Earthsystem : The satellite routes are drawn relative to the
earth's surface.
- Spacesystem : The satellite routes are drawn relative to
space.
|
- Beam :
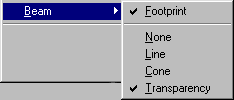 |
- Footprint : The footprints (circles) are drawn.
- None : The satellite beams are not drawn.
- Line : The satellite beams are drawn as lines.
- Cone : The satellite beams are drawn as colored opaque cones.
- Transparency : The satellite beams are drawn as partly
transparent cones. The transparency can be set in the satellite style
dialog.
|
- Stationary : If this menu item is checked, then the virtual camera will
be at a fixed point in space.
- Geostationary : If this menu item is checked, then the virtual camera
stays above a fixed position of the earth.
- Follow Satellite ... : This will open the Follow
Satellite dialog.
|
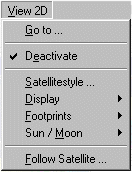 |
- Go to ... : This will open the Go To dialog. With the
help of this dialog you can go to a specified point on the earth's surface.
- Deactivate : Here you can close the View.
- Satellitestyle ... : This will open the
Satellite Style dialog. There you can change the apearance of the satellites
in the 2D-View.
- Display :
 |
- Footprints : If this point is checked, then the footprints
are drawn.
- Route : If checked, then the satellite route will be drawn.
- Name : If you activate this menu item then the name will get
displayed.
- Position : If you checked this point, then the satellite position
will be displayed.
|
- Footprints :
 |
- Colored : This will draw the footprints in the color you have choosen
in the satellite style dialog. If deactivated, then the border will be
drawn as a fine, black line.
- Line : This will just draw the outline of the footprint.
- Checked : This will give the footprint a checkered area.
- Area : This will fill the footprint like a shadow.
|
- Sun / Moon :
 |
- Moon : This point activates the Moon in the 2D-View.
- Sun : This point activates the Sun in the 2D-View.
- Tag / Nacht Linie :
 |
- Shaddow : This will draw the night side of the earth as a grayed area.
- Texture : This will use a night bitmap to display the night side.
|
|
- Follow Satellite ... : This will open the Follow
Satellite dialog.
|
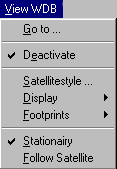 |
- Go to ... : This will open the Go To dialog. With the
help of this dialog you can go to a specified point on the earths surface.
- Deactivate : Here you can close the View.
- Satellitestyle ... : This will open the
Satellite Style dialog, where you can change the apearance of the satellites
in the 2D-View.
- Display :
 |
- Footprints : When this point is checked, the footprints are drawn.
- Route : If checked, then the satellite route will be drawn.
- Name : If you activate this menu item then the name will get
displayed.
- Position : If you check this point, then the satellite position
will be displayed.
|
- Footprints :
 |
- Colored : This will draw the footprints in the color you have chosen
in the satellite style dialog. If deactivated, then the border will be
a fine, black line.
- Line : This will just draw the outline of the footprint.
- Checked : This will give the footprint a checkered area.
- Area : This will fill the footprint like a shadow.
|
- Stationary : This will stop the WDB-View from following a specified
satellite.
- Follow Satellite ... : This will open the Follow
Satellite dialog.
|
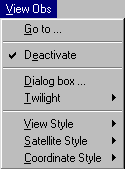 |
- Go to ... : This will open the Go To dialog.
- Deactivate : This menu item will close the observer view.
- Dialog Box ... : This will open the Observer dialog.
- Twilight :
 Twilight is the angle which tells you how far below the horizon you can see space objects. This effect is caused by the
earth atmosphere.
 |
- Civil (-6 deg) : This sets the twilight range to -6 degrees.
- Nautical (-12 deg) : This sets the twilight range to -12 degrees.
- Astronomical (-18 deg) : This sets the twilight range to -18 degrees.
|
- View Style :
 |
- Keep it 2D : If checked, the observer view is just 2
dimensional. You are looking up from your position into the sky.
- Draw Man : This will activate/deactivate the man, if the
observer view is in 3D mode.
- Hidden Lines : If activated, the Hidden lines will be drawn as dots.
- Hemi Sphere : The observer view is meant to display the sky from a
given position, thus looking upwards. Everything below the hemisphere is 'under your feet' and
you actually will have difficulties seeing it. Nevertheless you can deactivate this point and you
will get displayed where under your feet you should look.
|
- Satellite Style :
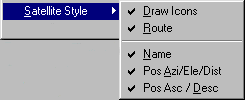 |
- Draw Icons : If deactivated, the satellite appear as a small cross.
- Route : Activate/deactivate the drawing of the satellite route.
- Name : Activate/deactivate the displaying of the satellite name.
- Pos Azi/Ele/Dist : Displays the satellite position in Azimuth,
Elevation and the distance to the observer's position.
- Pos Asc/Desc : Displays the satellite position as the point of
right ascension and declination.
|
- Coordinate Style :
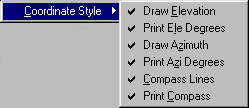 |
- Draw Elevation : Draws the elevation lines.
- Print Ele Degrees : Prints the elevation numbers.
- Draw Azimuth : Draws the azimuth lines.
- Print Azi Degrees : Prints the azimuth numbers.
- Compass Lines : Draws the Compass (circle).
- Print Compass : Prints the directions.
|
|
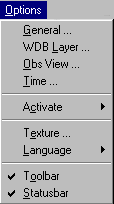 |
- General ... : This will open the General dialog.
- WDB Layer ... : This will open the WDB-Layer dialog.
- Time ... : This will open the Time dialog.
- Activate :
 |
- View 3D : This will activate/deactivate the 3D-View.
- View 2D : This will activate/deactivate the 2D-View.
- View WDB : This will either generate a WDB-View with
the whole world map, or it will close all open WDB-Views (Max. 10).
- View OBS : This will activate/deactivate the OBS-View.
|
- Texture ... : This will open the Texture dialog.
- Language :
 |
- German : This will activate the German version.
- English : This will activate the English version.
|
- Toolbar : Activates/deactivates the Toolbar.
- Statusbar : Activates/deactivates the Statusbar.
|
 |
- Arrange : Arrange the windows to fit efficiently the screen.
- Cascade : Arrange the windows in a cascade (overlapped).
- Tile : Arrange the windows so they all have the same size.
- Symbols : Arrange the symbols (icons) of the minimized windows.
|
 |
- About GPS ... : Opens the About dialog box.
|
- Dialog boxes
Here is the description of all the dialog boxes.
Time - Dialog
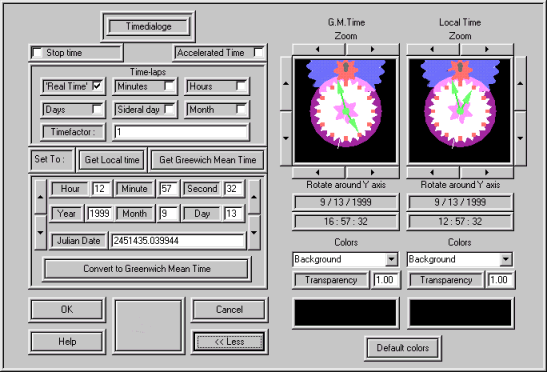 |
With this dialog you can change the time and date for the program and you can change the timefactor of the program.
- Stop Time : This checkbox will stop the current animation of the time.
- Accelerated Time : This checkbox will accelerate the time depending on the time - lapse factor.
- Time lapse check boxes : The time-laps checks can specify the time difference in
seconds between each calculated frame. If you choose 'Real Time' (timefactor = 1) then a second for the program
equals a real second.
|
- Timefactor : Here you can give any value for the timefactor. It is also possible to
adjust the timefactor by using the slider control at the right bottom of the main
frame.
- Get Local Time : This button will set the actual time and date to the local time and date.
- Get Greenwich Mean Time : This button will set the actual time and date to be the GMT time and date.
I.e. It will add/substract the timedifference between local and GMT from the actual time.
- 'Actual Time' Here you can specify the actual time. The arrow buttons on either side will
increase / decrease the actual time by ten seconds (right) or by one day (left).
- Convert to Greenwich Mean Time : This button will set the time and date to Greenwich (London)
time and date. I.e. It will add/substarct the time difference between local and GMT to the actual time.
- More >> | << Less This button will open up the left side of the dialog.
All the controls there are purely for display purposes of the time and won't affect the program functionality.
I included this part, to ensure the user understands the difference between local time and GMT time. All
calculated data is usually input as GMT - queries, but the program displays only local time. That is why
I wanted to clarify that the input is actually local time as oposed to most other programs.
|
Internet Dialog
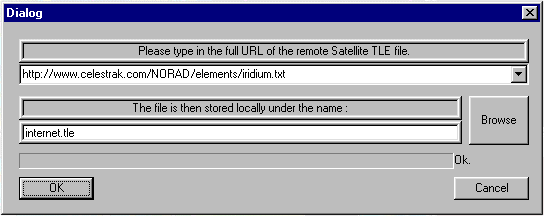
| With the help of the Internet-Dialog you can download the latest TLE data set
from the Internet. This way you'll always have the latest data set available.
The last 5 entries are stored in the drop down list
In der drop down liste werden die letzten 5 geladene Datensätze gespeichert.
Browse opens a file dialog where you can specify the
local file name.
|
 |
Satellite data dialog
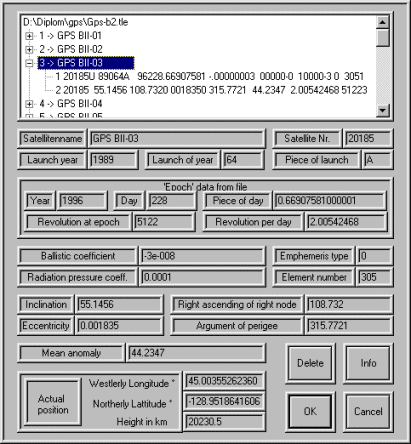
| The satellite data dialog displays the satellite data like you can find it in the database file (*.tle and *.sat). The
dialog also extracts all values and displays them in the proper fields. Also the actual satellite position gets calculated
and displayed.
It is possible, to delete satellites out of the file.
Warning : Those satellites that are deleted, are removed from the data file and can not be
retrieved anymore.
|
 |
Go To dialog
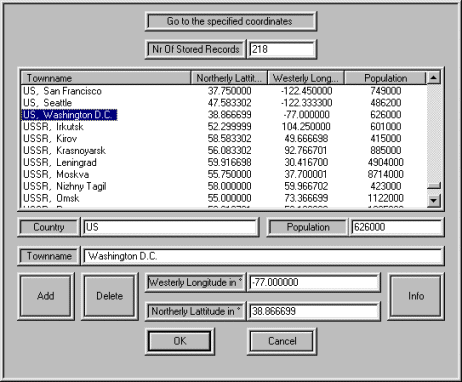 |
This dialog lets you pick one of the cities stored in 'smaltown.twn'. After you click the 'Ok' button, it will move the
actual view to this position. The only exception is the 2D-View. If you choose Go To while this view is active, it will
move the 3D-View to the given position. Also the WDB-View will not only move itself, but also the 3D-View to the
position.
|
Satellite Style dialog 3D
|
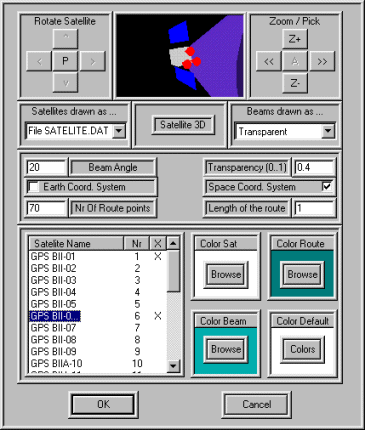
- Satellites drawn as ...
You can change the appearance of the satellites, by choosing from 'Nothing', 'Point', 'Cube', 'Sphere',
and 'File' : SATELITE.DAT'. If you pick the latter one, you can also use the two buttons on the top
( << and >> ), to pick from a stored model in the file.
'Z+' and 'Z-' will zoom in or out, so you can see the whole satellite model.
If you press 'P', then the animation will stop and the other buttons are activated.
You can use the arrow buttons to move the model now however you want. If you want it to move again,
just press the 'A' button, and the satellite will rotate again.
- Beams drawn as ...
Here you can pick between 'Nothing', 'Lines', 'Cone', and 'Transparent'. This will affect the way
the satellite beams are drawn.
|
- Beam Angle : Here you can change the maximum beam angel of the satellites. This will affect all
Satellites.
- Transparency (0..1) : This will change the transparency of the beam.
- Earth Coord System : If this box is checked, then the satellite route will be drawn
relative to the earths surface.
- Space Coord System : If this box is activated, then the satellite route will be drawn
relative to space.
- Nr Of Route points : This will let you type in the number of calculated route points (per satellite).
A smaller number will speed up the animation, but the quality of the displayed route will suffer.
- Length of the route : Here you can give the calculated length of the satellite route. This will
lengthen or shorten the route. One means going once around the world, 0.5 will span just half
of the earth.
- Satellites list box : This list box lets you check and uncheck the satellites to display.
It also gets the color for the satellite to the four buttons.
- The color buttons : You can change the actual color in the Color dialog.
|
Satellite Style dialog 2D
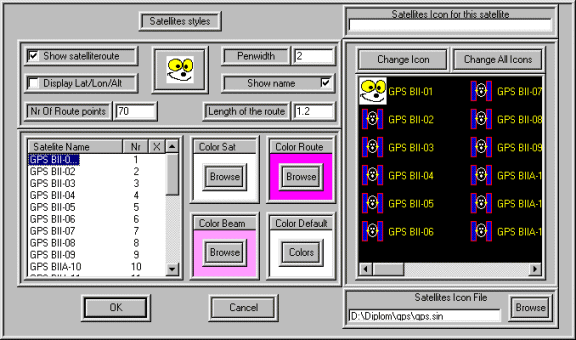 |
- Show satelliteroute : This check box will activate/deactivate drawing the satellite route.
- Display Lat/Lon/Alt : This will activate/deactivate displaying the satellite position.
- Penwidth : You can choose the pen width for the route and the footprint. This is helpful in higher resolutions.
- Show name : This will enable/disable drawing the satellite names.
- Nr Of Route points : This will let you type in the number of calculated route points (per satellite). A smaller number
will speed up the animation, but the quality of the displayed route will suffer.
- Length of route : Here you can give the calculated length of the satellite route. This will
lengthen or shorten the route. One means going once around the world, 0.5 will span just half of the earth.
- (smiley button) : This button will open/close the advanced part of the dialog where you can choose different icons.
- Satellite Icon for this satellite : The name of the icon for the selected satellite appears here.
- Change Icon : This will open a File Open dialog, where you can browse for the icon.
- Change All Icons : This will also open the File Open dialog, and all satellite icons will be changed
to this icon.
- Satellites Icon File : This is the information file, where all the names of the different icons are stored.
If you change this file, you can store many different satellite icon profiles.
- Satellites list box : This list box lets you check and uncheck the satellites to display. It also gets
the color for the satellite to the four color buttons.
- The color buttons : The Color dialog will appear, where you can change the actual color.
|
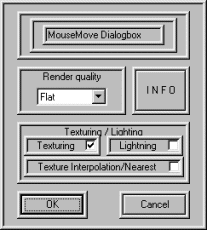
Mousemove Quality dialog
This dialog is responsible for the drawing style in the 3D-View when a mouse button is pressed.
- Render Quality : 'Smooth' will activate the Phong shading mode, 'Flat' the Flat Shading, and 'Wire Frame'
the Wire Frame mode.
- Texturing : Turns the earth texture on/off.
- Lighting : Turns the light calculation on/off
- Texture Interpolation/Nearest : This will increase the quality of the rendered earth, but the process is very slow.
It is turned off by default.
| 
|
Normal Quality dialog
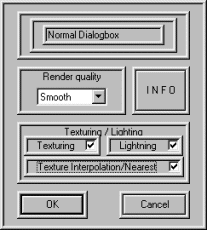 |
This dialog is responsible for the drawing style in the 3D-View if no mouse button is pressed.
- Render Quality : 'Smooth' will activate the Phong shading mode, 'Flat' the Flat Shading, and 'Wire Frame'
the Wire Frame mode.
- Texturing : Turns the earth texture on/off.
- Lighting : Turns the light calculation on/off
- Texture Interpolation/Nearest : This will increase the quality of the rendered earth, but the process is very slow.
It is turned off by default.
|
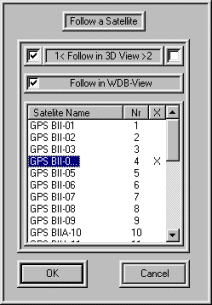
Follow Satellite dialog
This dialog box lets you choose a satellite to follow. If 'Follow in WDB-View' is checked, just the first WDB-View
will follow the satellite, the other WDB-Views will remain on the actual position.
- Follow in 3D-View 1 : This will activate the first method of following the selected satellite.
- Follow in 3D-View 2 : This will activate method 2 to follow a satellite in the 3D-View.
- Follow in WDB-View : This will let the WDB-View (zoomed) follow one satellite. Only the first
WDB-View will follow the specified Satellit. All other WDB-Views will remain on their actual positions.
- Satellite list box : Here you can choose which satellite to follow.
| 
|
Color dialog
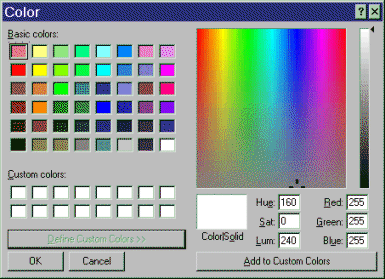 |
You can choose a color with this dialog. If the color you are looking for is not within the standard colors,
you can define a custom color.
- Define Custom Color >> : If you click on this button, the right side of the color dialog will appear.
- Add to Custom Colors : If you find your color, you can add it to the custom colors.
- Hue / Sat / Lum : Here you can manually insert the values for Hue, Luminance and Saturation (0 .. 255).
- Red / Green / Blue : Here you can manually insert the Red, Green and Blue part of the color (0 .. 255).
|
General dialog
- Number of background stars : You can select the number of generated background stars here.
- Sphere approximation X : This will not only change the number of approximation points for the spheres (earth,
moon, sun) but also change the number of points used to draw the footprint in the 2D-and WDB-View.
- Sphere approximation Y : This will change the number of approximation points for the spheres in the Y direction.
- Calculate exact satellite beam : In most cases, the satellite orbit is circular. In that case it is not necessary
to recalculate the distance for the footprint every time. But some satellites have an elliptical orbit. So it is necessary
to recalculate the distance to the earth's surface every time. This check box will activate this feature.
- Automatically place windows : This check box will enable/disable the automatic sizing at startup and when
constructing a View.
| 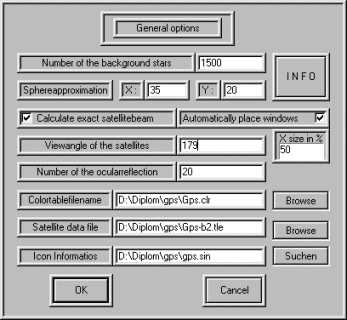 |
- X size in % : Here you can give a startup size for the Views in % of the Screen resolution. Eg. 50%=512 if the
screen resolution is 1024 * 768.
- Viewangle of satellites : Here you can change the maximum view angle of the satellites in degrees.
- Number of Ocular reflections : This will change the number of ocular reflections in the 3D-View. It is possible to
have up to 20 reflections painted on the screen, but it will slow down the drawing time.
- Color table file name : You can store different color schemes (satellites and beams). The default color scheme gives the
satellites the same color as the toolbar buttons.
- Satellite data file : You can enter another satellite data base here. It is the same as using File->Open.
- Icon information : This file stores the information for the different satellite icons.
|
WDB Layer dialog
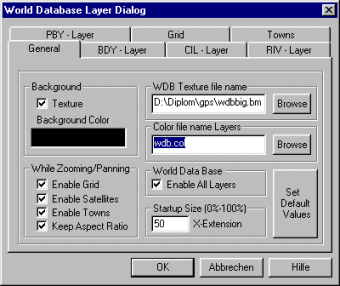 |
- Texture : If you disable this check box, the WDB-View will use the defined color as background rather then the
texture. Nevertheless it is a texture used for scrolling, zooming and panning and stays there until you hit the
'D'raw button to draw the WDB-data.
- Background Color : You can change the background color here, if you have disabled the texture.
- WDB Texture file name : You can choose the texture for the background here. Fancy effects with faces though ;-)
- Color file name Layers : The chosen colors for borders, rivers, etc. can be changed and are stored in
this file. To change the whole apearance of the view, try to change the colors.
- Enable all Layers : This will draw all data layers. You don't need to activate all manual.
|
- Startup size X-Extension : This will give the default X-extension of the view. The Y-extension depends on
the x/y ratio of the zoomed range. 100% equals the screen's X-resolution.
- Set Default values : This will reset all default colors, and activate just the default layers.
- Enable Grid : Draws the grid while you are moving around in the world.
- Enable Satellites : Draws the satellites while you are zooming or panning.
- Enable Towns : Draws the towns 'small dataset' while zooming or panning.
- Keep Aspect Ratio : If this check box is not set, you can use the zooming to stretch or shrink the view.
While there is no scientific reason for this flag, it is a lot of fun to play around without this flag.
It makes the earth look like it has depth.
|
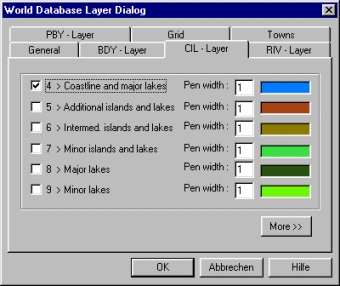
The next four tab pages are basically the same. The four pages equals the files with the endings : bdy, cil, riv, and pby.
- Checkboxes : These check boxes will enable/disable the layer. There are a total of 28 layers stored in the
WDB data set.
- Pen Width : This will set the pen width of the layer to the size. Sometimes it is nice to see a border (sized 3)
and a river (sized 1) in the middle.
- Color : This will open the Color dialog, where you can choose the color for
each layer.
|
|
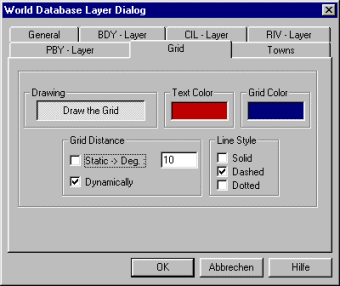 |
- Draw the Grid : This button enables/disables the drawing of the grid.
- Text color : This will open the Color dialog, where you can pick the text color.
- Grid color : This will open the Color dialog, where you can choose the color of the grid.
- Static -> Deg. : If this check box is set, then the grid distance will be whatever
the value is in thetext box is. (eg. 10 Deg.)
- Dynamically : If this check box is set, the grid distance is adapted dynamically, to give a good impression
of the view.
- Solid : If checked, the grid lines will be solid lines.
- Dashed : If checked, the grid lines will be dashed lines.
- Dotted : If checked, the grid lines will be dotted lines.
|
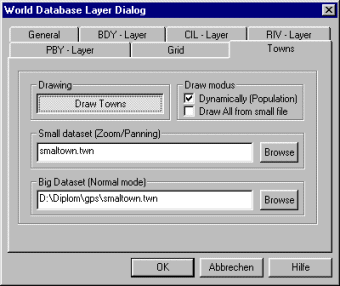
This dialog lets you choose two different data sets for the towns. This is necessary because it is not possible, to
be interactive (zoom/pan) while drawing some 2700 towns. The small data set shouldn't have much more than approx 300 towns.
It is recommended that you edit this file, to put all your important towns in it.
- Draw Towns : This button will enable/disable the drawing of the towns.
- Dynamically (Population) : If this check box is set, the biggest towns are
displayed. But if you zoom in, the smaller towns will be displayed also. This is useful, if you display a
big part of the world and you want to see something in detail, but have all the towns available.
| 
|
- Draw all from small file : If this check box is set, then all the towns from the small file will be drawn while
zooming/panning. This comes handy if you are looking for a certain town while zooming.
- Smal Dataset : Here you can name the small data set.
- Big dataset : Here you can name the big data set.
|
Export dialog
This dialog will let you generate reports in plain text format, or in EXCEL's csv - format with comma delimiters. You can
actually enlargte the dialog box, to view more data in the preview window.
|
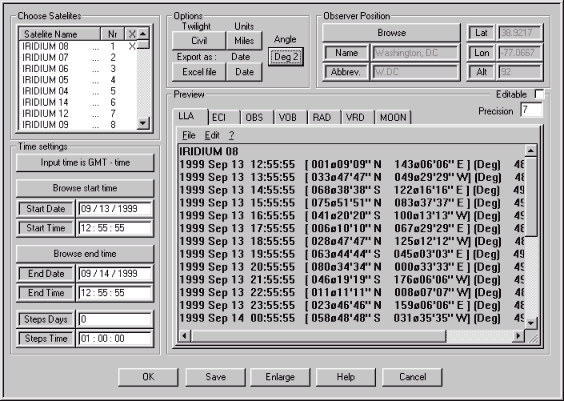 |
The preview window itself is a simple but usefull texteditor with only the most basic features. You can also edit the generated
text, by checking the 'editable' chakcbox in the upper right corner.
The '?' in the editor will give you a short comment on the generated report.
This is the only dialogbox which is non modal implemented. So the animation can proceed in the background while looking at the data.
|
- Choose satellites : Here you can choose which satellites are calculated.
- Time settings : This area let you set the time for which you want to see the
report. The time of the main program is not affected.
If you specify a time range, where more then 1.000 records per spacecraft would get calculated then a
MesageBox will ask you if that is correct.
- Input time is GMT - time : This button lets you switch between the input
time beeing local or GMT.
- Browse start time : This button will open the Time dialog
where you can choose the start time.
- Browse end time : This button will open the Time dialog
where you can choose the end time.
- Time steps: Here you can specify the time steps between every calculated
satellite position.
- Options : Here you can set the units for generated the output.
- Observer position : If you choose a report tab, where the Observer position is needed,
This area will become editable. You can also choose the location with the Go to Dialog.
However you will have to specify the Hight of the Observers position.
- Preview Area : Here you can preview the output before saving it to disk. You can also edit
and / or print the preview. The '?' will give a short description of the generated output.
- Precision : You can modify the length of the precision output. It is possible
to see up to 30 digits. Of course the accuracy is much less.
|
Weather Dialog
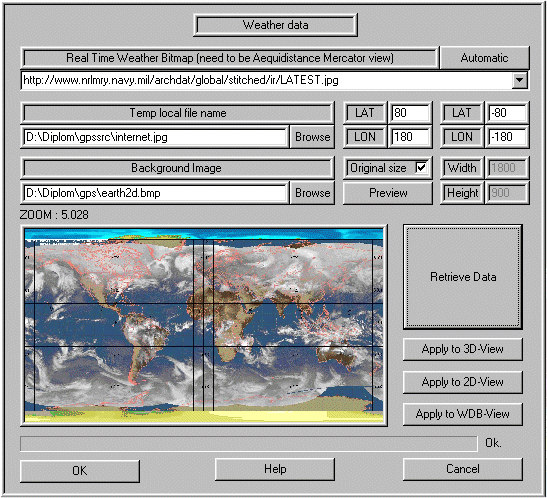
| This dialog allows you to load the most current weather map from the internet and to
overlay it over a background image. This way you get an overview of the global weather
conditions.
- Real Time Weather Bitmap : The current weather map from the
Internet. You have to specify the exact URL here to download the map.
- Automatic : This button generates the URL which leads to the most
current weather map.
- Temp lokal file name : Here you can specify the local filename where the
weather map should be stored.
- Background Image : Here you specify the background image for the weather map.
This is neccesary becaus the real time weather map does not neccesarily have to span the whole globe.
- LAT / LON : Here you can specify the start-, end coordinates of the
weather map. These values depend on the weather map itself.
- Original size : This checkbox will ensure that the original size of
the weather map. This also means that the width and height is not the width and size of the weather map itself
rather it is the size for the full globe.
- Preview : This button will generate a preview using the local images.
This way you can view a weather map even if you are not connected to the internet.
- Retrieve Data : This button will attempt to download the weather map from the
Internet.
- Apply to 3D-View : This button will use the generated image as the texture
in the 3D-View.
- Apply to 2D-View : This button will use the generated image as the background
in the 2D-View.
- Apply to WDB-View : This button will use the generated image as the background
in the WDB-View.
|
 |
Texture dialog
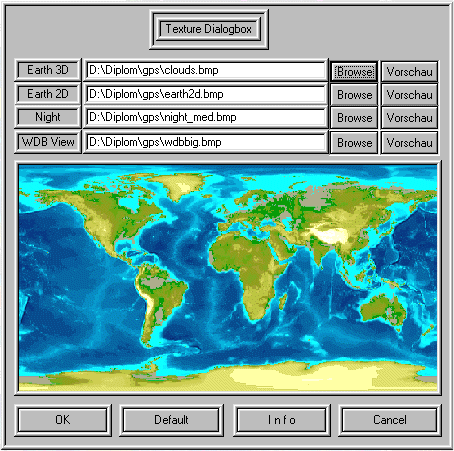 |
- Earth 3D : Here you can name the texture for the 3D-View. This texture should be
the size of 2^n * 2^m and have a color depth of at least 16 bit. However if those conditions don't hold true
GPS Is attempting to resize the image and change its color depth.
- Earth 2D : Here you can name the texture for the 2D-View.
- Night : Here you can name the texture night side of the 2D-View.
- WDB-View : Here you can name the texture for the WDB-View.
- Preview : The Preview buttons will display the chosen bitmap in the preview window.
- Default : This button will reset the textures to the default texture names.
|
Observer dialog
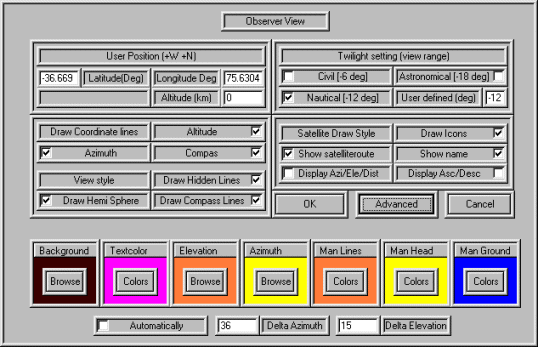 |
- Latitude : Here you can type in the latitude of the observer position.
- Longitude : Here you can type in the longitude of the observer position.
- Altitude : Here you can type in the altitude of the observer position.
- Civil : This will set the twilight to -6 Deg.
- Nautical : This will set the twilight to -12 Deg.
- Astronomical : This will set the twilight to -18 Deg.
- User Defined : This will set the twilight to any user defined value.
- Altitude : This check box enables/disables the drawing of the altitude lines.
- Azimuth : This check box enables/disables the drawing of the Azimuth lines.
- Compass : This check box enables/disables the drawing of the Compass (N, W, S, E).
- Draw Hidden Lines : This check box enables/disables the drawing of hidden lines.
- Draw Compass Lines : This check box enables/disables the drawing of the compass lines.
- Draw Hemi Sphere : This check box enables/disables the drawing of just the visible part of the Horizon.
- Draw Icons : If unchecked, the satellites are drawn as a small cross.
- Show satellite routes : Enables/disables the satellite route.
- Show names : Enables/disables the names of the satellites.
- Display Azi/Ele/Dist : Enables/disables the display of the satellite position from an observers point of view.
- Display Asc/Desc : Enables/disables the display of the right ascending and descending point.
- Advanced :
- Color buttons : This will open the Color dialog and change the appropriate color.
- Automatically : Enables/disables the automatic calculation of the delta angles for the Azimuth and Elevation lines.
- Delta Azimuth : You can manually set the delta Azimuth angle (the distance between two Azimuth lines).
- Delta Elevation : You can manually set the delta Elevation angle (the distance between two Elevation lines).
|
- Toolbar
The size of the toolbar is dynamically adapted to fit the number of satellites in the memory. The first five buttons are
equal to the menu items under Animation,which are PLAY, PAUSE, RESET, ZOOM, and DRAW. The sixth
button will display all satellites at once.
You can dock the toolbar on every side of the main window, however, if the satellite database exceeds the number of buttons,
the toolbar can display in one line, you should detach it from the mainframe and resize it so that you can see all the
toolbar buttons.
If there are more then 60 satellites loaded, you can activate those above 60 by using the
satellite style dialog 2D or satellite style dialog 3D
dialogs (eg. 'View 3D'->'Satellitestyle ...').
- Slider Control
With the slider control you can adjust the timefactor. The control is not linear, so it is easier to find lower values more
easily. The rang for the slider control is between 1 and 3600.


 Twilight is the angle which tells you how far below the horizon you can see space objects. This effect is caused by the
earth atmosphere.


